Title here
Summary here
The RP2040 has a u2f bootloader in ROM (etched into the die) meaning it can’t be bricked or overwritten which is great news.
To get RP2040 boards into bootloader mode you have to disable the flash on startup. You can accomplish this on Helios by using the reset button / reset pin and pushing it / pulling it to GND for over 500ms (while it’s plugged into a PC of course).
The method varies for other boards, but on the Pi Pico for example you can hold the BOOTSEL button while plugging it in and it should also enter the bootloader.
The controller should reboot and enter the bootloader mode automatically - you will see a flash drive pop up on you PC called RPI-RP2
You can take your keyboardfirmware.u2f file and copy it to the mounted drive. It will unmount and reboot itself. If the firmware flashing process succeeded, you will have a working keyboard. If not, please repeat the procedure. Since the bootloader is edged into ROM, it can’t be bricked. You are very unlikely to break something.
WCH chips are low-cost integrated circuits (ICs) that use FAK firmware. Getting your firmware onto your board consists of two different steps. You will use GitHub Codespaces to create your firmware, and after that WCHISP to flash said firmware onto your controller.
Download the latest WCHISP release from here. You can also find great instructions on what the tool does and how it works over there.
Afterwards you will have to use
GitHub Codespaces to compile and download your .ihx firmware file. You can find instructions on how to set up a Codespace
here.
.ihx file into the same folder as WCHISP.wchisp info to see your chip information.wchisp flash ./firmware.ihx (adjust for your firmware file name). Once complete, unplug and replug the board.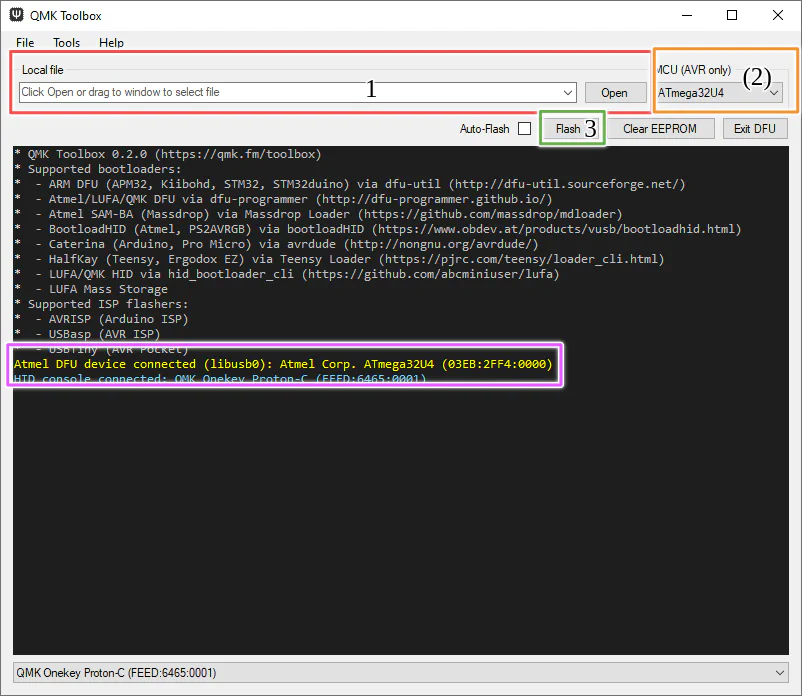 Download and install
QMK Toolbox.
When you open it you can select your keyboardfirmware.hex in the local file dialog (1).
Then select the MCU (2).
Download and install
QMK Toolbox.
When you open it you can select your keyboardfirmware.hex in the local file dialog (1).
Then select the MCU (2).
Now this part differs per keyboard (different bootloaders, different bootmagic configs), but in general you can hold escape while plugging the board in or press reset while the board is plugged in to enter DFU mode.
You will see a yellow message in the toolbox console stating that a DFU device connected (pink frame).
Now you can press Flash (3) and wait for “Validating… Success”
Your keyboard was flashed succesfully and you are good to go
Consult your keyboard manu for other methods.
run this command in the qmk code directory and edit the command to relect you keboard and keymap
make 0xcb/1337:default:flash
Please refer to the RP2040 guide for u2f (bootloader not in rom) and to the AVR guide for dfu-util (you dont have to select the mcu for arm).